
The objective of this article is to show how to compile, deploy and run a SOAP web service with Apache CXF using WS-Security and the Blueprint configuration. The web service will be exposed through the OSGi HTTP Service in Fuse Enterprise Service Bus (ESB) Enterprise. The project will be built with the Fuse Integrated Development Environment (IDE) and will include the code for the server as well as client code.
I will highlight the following with the Fuse IDE:
- how to configure JAX-WS Web services by using the blueprint configuration file
- how to configure WS-Security on a CXF JAX-WS Web service in Blueprint
- how to use standard Java Web Service annotations to define a Web service interface
- how to use standard Java Web Service annotations when implementing a Web service in Java
- how to use use an HTTP URL to invoke a remote Web service
- how to deploy the bundle
- how to test the Web Service
 Note: A quickstart is
included with Fuse ESB Enterprise 7.1.0 that is located at <esb_home>/examples/secure-soap
which concentrates on building, deploying and running the included example code
from the command line. We will be
importing this project into the Fuse IDE.
Also a similar quickstart without the blueprint configuration is
located at <esb_home>/examples/cxf-ws-security-osgi
in Fuse ESB 4.4.1.
Note: A quickstart is
included with Fuse ESB Enterprise 7.1.0 that is located at <esb_home>/examples/secure-soap
which concentrates on building, deploying and running the included example code
from the command line. We will be
importing this project into the Fuse IDE.
Also a similar quickstart without the blueprint configuration is
located at <esb_home>/examples/cxf-ws-security-osgi
in Fuse ESB 4.4.1.
One of the OSGi Best Practices is
related to the usage of the Blueprint Container instead of Spring-DM. The Blueprint container is now the preferred
framework for instantiating, registering, and referencing OSGi services,
because this container has now been adopted as an OSGi standard. Following this
best practice and standard will ensure greater portability for your OSGi
service definitions in the future.
Spring Dynamic Modules
(Spring-DM) provided much of the original baseline for the definition of the
Blueprint standard. But currently
Spring-DM would be considered deprecated.
Using the Blueprint container
does not prevent you from using the Spring
framework: the latest version of Spring is compatible with Blueprint.
Overview of Products and Standards
Fuse ESB Enterprise
Fuse ESB Enterprise is a
comprehensive, standards-based integration platform that can be configured with
any combination of components for a customizable IT footprint. The diagram below highlights the components
and additional information can be found in the tech brief overview Fuse ESB Enterprise Tech Overview
as well as detailed product
documentation.
"An ESB is a standards-based integration platform that combines messaging, web services, data transformation, and intelligent routing to reliably connect and coordinate the interaction of significant numbers of diverse applications across extended enterprises with transactional integrity." --David A. Chappell, Author Enterprise Service Bus

Diagram 1 - Fuse ESB Enterprise Components
Fuse IDE
The Fuse IDE is a graphical
design and test environment for integration applications. The key tools that
are used during the phases of application development include - template based
project creation, visual route editor, container provisioning, JMX-based
infrastructure monitoring, Fuse Fabric monitoring and
message tracing.
Detailed documentation for both
the Fuse ESB Enterprise and Fuse IDE can be found on the Red Hat Customer
Portal Product
Documentation Page.

Screen Shot 1 - Product Documentation Page with FuseSource Products
OSGi
Open Services Gateway initiative (OSGi ) is set of open
specifications that make it easier to build and deploy complex software
applications. The OSGi Framework, the key piece of OSGi technology, is
responsible for loading and managing the dynamic modules of functionality,
otherwise known as bundles.

Screen Shot 2 - OSGi Web Site
Prerequisites
The Products and their versions
used in the article are listed below:
·
Fuse ESB Enterprise 7.1.0
·
Fuse IDE 7.1.60
·
JDK 1.6
The Fuse products can be
downloaded from the Red Hat Customer Portal JBoss Middleware Download
Page. The steps are the same for the
Windows and RHEL platforms and both were tested. Download the binaries and install into a Fuse
directory. The notations <esb_home>
will indicate the default Fuse ESB extracted files location at <fuse_directory>/fuse-esb-7.1.0.fuse-047
and <ide_home> will be <fuse_directory>/FuseIDE.

Screen Shot 3 - Product Download Page
Import the project
Our first step is to start the
FuseIDE by running the FuseIDE executable located in <fuse_home>. Import
the existing Maven Project by selecting File, import and then the Import Source
Existing Maven Project.

Screen Shot 4 - Import Existing Maven Project
Click next and then select the secure-soap example located
at <esb_home>/examples/secure-soap.

Screen Shot 5 - Secure SOAP Project
Click on the OK button which will then display the project
dialog with the project selected.

Screen Shot 6 - Maven Project
Click next and the Mavin plugin connector dialog will
display which shows the Eclipse plugins mapped to Maven plugin goal executions.

Screen Shot 7 - Maven plugin connectors
Click Finish which will start the importing of the project.

Screen Shot 8 - Import Maven project
After the project is imported then no problems should be
showing in the problem pane.

Screen Shot 9 - Project Imported
Create the new server
Modify the users.properties file
in <esb_home>/etc to contain the admin username and password required
when setting up the new server instance in the IDE. Remove comment from user admin and password
admin.
#All users specified in this file, will be uploaded to the
fabric registry and will
#be available to all containers that join the fabric.
#The password of the first user in the file will also be
used as a registry (zookeeper) password
#unless a password is explicitly specified.
admin=admin,admin
Code Block 1 - users.properties
Next select File then New then other from the menu. Click on server and the next button to add a
new server.

Screen Shot 10 - New Server Wizard
Select the Fuse ESB Enterprise 7.x Server and click next to
accept the defaults.

Screen Shot 11 - New server type
Browse to the <esb_home> for the installation
directory and click on next.
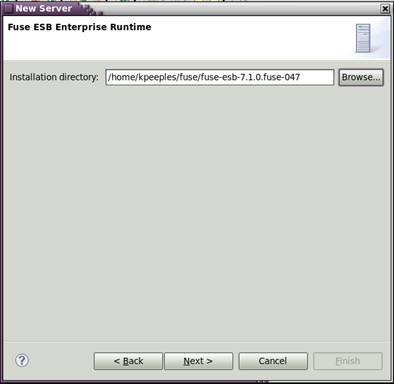
Screen Shot 12 - Installation directory
Enter the admin user name and password that was entered in
the users.properties file in Code Block 1.
Then click finish to create the new server.

Screen Shot 13 - Server Configuration
Build the project
Right click on the pom.xml and select Run as Maven clean.

Screen Shot 14 - Maven Clean
Next right click on pom.xml and select Run as Maven install.

Screen Shot 15 - Maven install
Next select the Fuse Integration perspective.
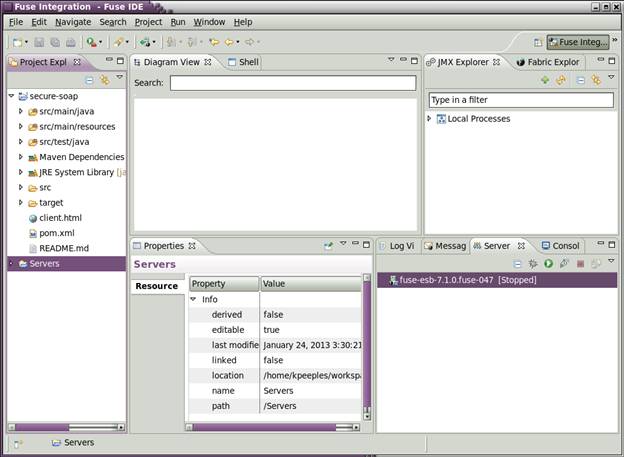
Screen Shot 16 - Fuse Integration Perspective
Start the Server
Start the server by clicking the start button in the Server
panel.

Screen Shot 17 - Start Server
Deploy the Web Service
Setup the deploy folder for the bundle by right clicking on
the pom.xml then select the deploy folder configurations. Enter the Name and browse to the deploy
folder at <esb_home>/deploy then click add.

Screen Shot 18 - Deployment Folder
Right click on pom.xml and select the deployment folder to
deploy the service.

Screen Shot 19 - Service deployed
The bundled jar should be in the deployment folder.

Screen Shot 20 - jar file
Testing the Web Service
A full listing of all CXF Web services is available at
http://localhost:8181/cxf.
After you deployed this example, you will see the
`HelloWorldSecurity` service appear in the `Available SOAP Services` section,
together with a list of operations for the endpoint and some additional
information like the endpoint's address and a link to the WSDL file for the Web
service.

Screen Shot 21 - CXF Web Service List
Clicking on the WSDL link above or entering the URL in the
browser will display the WSDL http://localhost:8181/cxf/HelloWorldSecurity?wsdl

Screen Shot 22 - Service WSDL
Testing the service can be done
with the provided client.html file or by using the SOAPUI plugin in the Fuse
IDE. Right click on the client.html file
and open with the browser. Click the
send button to send the request and view the response. Once
the request has been successfully sent, a response similar to the following
should appear in the right-hand panel of the web page.

Screen Shot 23 - Browser Client Test
You can also run the Java Client code by right clicking on
the client.java and selecting Run as Java Application. The name in the sayHi method can be modified
prior to running the client as seen in the highlighted code block below.

Screen Shot 24 - Java Client Test
The client uses a client proxy
for the Web service to invoke the remote method - in reality, a SOAP message
will be sent to the server and the response SOAP message will be received and
handled. You will see this output from
the remote method:
Apr 4, 2012 7:48:13 AM
org.apache.cxf.service.factory.ReflectionServiceFactoryBean
buildServiceFromClass
INFO: Creating Service
{http://security.jaxws.cxf.examples.fusesource.org/}HelloWorldService from
class org.fusesource.examples.cxf.jaxws.security.HelloWorld
Hello My Name
Files included in the example
The file descriptions below describe the main files in the
example:
pom.xml
the
Maven POM file for building the example
client.html
a
Web client that can be used to test the Web service from your browser
src/main/java/org/fusesource/examples/cxf/jaxws/security/HelloWorld.java
a Java interface that defines the Web service
src/main/java/org/fusesource/examples/cxf/jaxws/security/HelloWorldImpl.java
a Java class that implements the Web service
src/main/java/org/fusesource/examples/cxf/jaxws/security/client/Client.java
a Java class implementing a client that connects to the Web service using an
HTTP URL
src/main/java/org/fusesource/examples/cxf/jaxws/security/client/ClientPasswordCallback.java
a Java class implementing authentication callback by checking the identifier
and password
src/main/java/org/fusesource/examples/cxf/jaxws/security/client/CustomSecurityInterceptor.java
a Java class which set the security properties for the client
src/main/resources/OSGI-INF/blueprint/blueprint.xml
the OSGI Blueprint file that defines the services
Additional configuration options
The following additional configuration options describe managing user credentials and changing the cxf servlet alias.
Managing the user credentials
You can define additional users in the JAAS realm in two
ways:
1. By editing the `etc/users.properties` file, adding a line
for every user your want to add (syntax: `user = password, roles`).
myuser =
mysecretpassword
2. Using the jaas: commands in the Fuse ESB Enterprise
console:
jaas:manage --realm karaf
jaas:useradd myuser mysecretpassword
jaas:update
Changing /cxf servlet alias
By default CXF Servlet is assigned a `/cxf` alias. You can
change it in a couple of ways:
1. Add `org.apache.cxf.osgi.cfg` to the `/etc` directory and
set the `org.apache.cxf.servlet.context` property, for example:
org.apache.cxf.servlet.context=/custom
2. Use shell config commands, for example:
config:edit
org.apache.cxf.osgi
config:propset
org.apache.cxf.servlet.context /custom
config:update