Wednesday, March 25, 2015

Getting a S User ID for SAP Service Marketplace


A SAP (Systems, Applications and Products in Data Processing) S User ID is a unique number that SAP uses for identifying people on its web portals and databases.  The SAP Service Marketplace is the SAP portal for all its customers/partners with all the relevant information about their software, licenses, documentation, additional information, etc.  It is also required to register for SAP Certification.  The S User ID is very similar to other forms of authentication used by other companies, such as Apple with Apple ID, that gives access to Apple App Store, and Microsoft with Live ID, that gives access to Hotmail and other online services. We will be posting future blogs on using the SAP Java Connector and the S User is required to get a License for our cloud appliance demo system.  The S User is in the format of S followed by 10 digits.  There are three ways to get a S User.

1.  The first option one is to let your system administrator or Partner SPOC do it for you. You need to know who is the SAP Point of Contact for your company. Then, you can simply contact him or her to request them to create an S User ID for you.


2.  If you have no idea who the SAP administrator is for your company then you can register for an SAP S user ID by clicking the registration link in the upper right hand of SAP Service Marketplace home page or by following the link: http://service.sap.com/request-user. Please note that the customer or installation number is required for those who want to register as customer and a partner number is required for those who want to register as an SAP partner.  In case you do not know customer or installation numbers that are required for option two, they can be requested through the SAP Customer Contact Us Page.

3.  Option three is suitable for those that want to register for SAP certification. During registration for SAP certification you will be assigned an SAP S User ID or will have an opportunity to create it.  If you register for certification offline (by phone or in the SAP center) you should ask the SAP representative about your S User ID.

Tuesday, March 24, 2015

API management: Critical for success in the digital economy

Please join us for a API Management webinar Thursday, April 9, 2015 at 11:00 AM EST.  Syed Rasheed, Senior Product Marketing Manager at Red Hat, Mark Cheshire, COO at 3scale, Manfred Bortenschlager, API Market Development Director at 3scale and myself are the speakers for the webinar.

Just as every business has a website to share data or services for people, soon application programming interfaces (APIs) will be used to share such assets in a machine-processable way. Gartner predicts that by 2016, 75% of the Fortune 1000 will offer public web APIs and 50% of business to business collaboration will take place through web APIs.

API management provides organizations with full control and visibility of their APIs and helps to use the power of sharing organization's assets—data or services—via APIs, in a simple and quick way. During this session, we will introduce how you can use Red Hat® JBoss® Fuse, OpenShift by Red Hat, and 3scale to manage and control APIs. We will conclude with a practical demo.

Join this webinar to learn how to:

  • Build and deploy your APIs.
  • Secure your APIs via access control.
  • Control your APIs via usage policies.
  • Operate your APIs via monitoring, analytics, reporting and billing.
  • Engage with developers through developer portals and interactive API documentation.

Friday, March 20, 2015

Preview of Build your next enterprise application in 60 minutes with JBoss Middleware

I am pleased to announced that our talk below was accepted at Summit 2015.   Our initial architecture is described in the diagram below as well as the abstract.  


Abstract: Business demands for new applications are increasing as businesses seek new ways to engage with their customers. As a result IT is at the center of a sea change in application development as new approaches like DevOps emphasize rapid delivery of features and greater participation by end users and “citizen developers”.

Middleware technologies such as integration, business rules, BPM , mobile application platforms and Platform-as-a-Service (PaaS) are emerging as important tools for DevOps teams, greatly reducing the traditional coding requirements for new business applications. With appropriate use of middleware, DevOps teams can collaboratively and rapidly develop and manage applications that engage customers and connect to back end services and legacy systems.

Join us for this session where we will show how three middleware technologies – integration, business process management and mobile – can be brought together in the cloud to support development of context-aware, process enabled, connected enterprise mobile apps. We’ll show you how to delight your employees and customers with modern solutions that deliver results quickly and yet integrate seamlessly into existing infrastructure. Through a real-word use-case we will demonstrate:
  • Development and deployment of an enterprise mobile app using FeedHenry’s Mobile Application Platform
  • Inclusion of captured mobile information into business processes with JBoss BPM Suite
  • Integration of automated processes with legacy applications and systems of record with JBoss integration solutions
  • Automation of business decisions guided by business rules
  • Attendees will gain an appreciation for the ease with which middleware-enabled applications can support ever-changing business needs, and an understanding of the benefits of Red Hat JBoss Middleware products.

Wednesday, March 18, 2015

Easy integration with JBoss Fuse Connectors


A Fuse Connector provides easy integration of your applications inside the Enterprise as well as externally by providing a uniform endpoint interface and acting as connectors to all other systems.   We have been working over the last couple of months to build examples of using the individual components that Apache Camel provides in JBoss Fuse.  We have created a Fuse Connector Page that describes each component and provides a Article with Source and Video.  After browsing to the connector page, click on a connector that you are interested in, such as salesforce or twitter.


A pop-up will provide the Connector description, the link to the Product documentation and links to a Article and Video which also includes source code.  We are continually adding more examples so check back if we have not yet updated a component that you are interested in.

Feel free to reach out to us on our blogs and twitter.

Christina Lin  @christina_wm
Kenneth Peeples  @ossmentor

Also, Check out more demos from the JBoss Technology Evangelists at JBoss Demo Central.

Monday, March 16, 2015

Data Virtualization Web UI now released for Developer Preview


We are very happy to announce the Data Virtualization 6.1.0 WebUI for Developer Preview. An easy and simple way to create artifacts through a web interface and help be productive with DV in minutes. Once signing onto the WebUI you can create your Data Services and manage your Data Library. Watch for more Articles, Videos and Blogs for using the WebUI. The WebUI is a compliment to the Teiid Designer in the integration stack for Eclipse.

The steps to install the Data Virtualization WebUI are simple and they are listed below. 

Step 1: Download Data Virtualization 6.1.0 GA installer and the WebUI war from jboss.org DV downloads

Step 2: After installing DV 6.1, give the teiidUser the odata and rest roles. The user must have these roles to access the rest and odata endpoints. The roles file is located at:

SERVER_DIR/standalone/configuration/application-roles.properties 

The teiid user will look like this: teiidUser=user,odata,rest 

Step 3: Copy the war to: 

SERVER_DIR/standalone/deployments 

Step 4: Open a browser and access the login page with username admin and password admin at

http://localhost:8080/dv-ui


If you are interested in contributing you can find information at https://github.com/Teiid-Designer/teiid-webui


Friday, March 13, 2015

Security Content Automation Protocol (SCAP) Compliance Checker

The SCAP Compliance Checker (SCC) is a Security Content Automation Protocol (SCAP) validated application developed by Space and Naval Warfare (SPAWAR) Systems Center Atlantic.   Version 4 has been officially released.

Obtaining the Software (DOD)
For Department of Defense (DOD) users with a valid Common Access Card (CAC), the software can be downloaded directly from DISA: http://iase.disa.mil/stigs/scap/index.html then scroll down to "SCAP Tools"

Obtaining the Software (Non-DOD)
For US Government Employees and contractors, the software can be obtained via the Office of Management and Budget (OMB) hosted MAX.omb.gov website. Users will be required to self-activate an account in order to obtain the files.

After registration, the software can be downloaded from:
https://max.omb.gov/community/x/KYRhKg

Alternate Method
SCC is available for any government employee or contractor to the US government; it is not available to the general public.

If you are unable to download SCC by one of the 2 primary methods above, the software can be requested by emailing: [email protected] . Please include the following in your request:
  1. US Federal agency you are supporting
  2. Government POC with .gov or .mil email address or Contract Number
Standards Supported - Platforms Supported:

SCAP Version: 1.0 - Windows XP & Server 2003
OVAL Version: 5.10.1 - Windows Vista & Server 2008
XCCDF Version: 1.1.4  - Windows 7 & Server 2008 R2
CPE Version: 2.2  - Windows 8 & Server 2012
CCE Version: 5.0 - Solaris 10
OCIL Version: 2.0 - Red Hat Enterprise Linux 4 & 5
DOD ARF Version: 0.41  - Debian Linux 5 & 6
Cyberscope Version: 1.0.0 Early Access Release - Mac OS X 10.6, 10.7

Tuesday, March 10, 2015

Picketlink and Keycloak projects are merging!

Boleslaw Dawidowicz has written a blog with detail regarding Picketlink and Keycloak projects merging.  Check out his blog here and some excerpts are below.   A Knowledge Base article has also been published which is here.

Together with new PicketLink 2.7.0.Final release, we would like to announce that PicketLink and Keycloak projects will be merging their efforts. Code base of both will get unified and new features will be developed in a single place.

As part of this merge all key features of PicketLink will get included into Keycloak. Combining strengths of both projects and providing their communities a single polished and unified security solution. Joining both efforts should enable faster progress on new features which will be beneficial for all users and developers leveraging those solutions.

What you can expect happening during next few months?


  • Specific parts of PicketLink codebase being forked and merged into Keycloak. We are starting with PicketLink Federation / SAML. 
  • Inclusion or implementation of particular features will get discussed in public on theKeycloak project mailing list. We are looking forward for your participation there as we would like to hear your feedback on changes that we are doing. 
  • Web sites for both projects will get slightly changed to reflect new situation.
  • Many new cool features coming shortly!

Pedro Igor Silva - PicketLink Project Leader
Bill Burke and Stian Thorgersen - Keycloak Project Leaders
Bolesław Dawidowicz - Security Platform Architect at Red Hat.

Wednesday, March 4, 2015

The new JBoss Demo Central Github Organization and Site


I am pleased to announce, along with the other JBoss Technology Evangelist -Eric Schabell, Thomas Qvarnstrom and Christina Lin, our Central Organization for JBoss Demo Repositories is available.  The team has worked hard to pull together existing content and start new content as well.

There are two ways to access jbossdemocentral -
1) The website with an easy to navigate front end to access the source code, videos, articles, etc for each demo - http://jbossdemocentral.comhttp://jbossdemocentral.com/#/
2) The github organization with all the source code repositories for the demos -http://github.com/jbossdemocentralhttps://github.com/jbossdemocentral/

Give the demos a try and follow us on twitter and our blogs!

Tuesday, March 3, 2015

Running a simple demo with the Salesforce Connector with Fuse


Overview

JBoss Fuse and Apache Camel provides an easy to use Salesforce Connector to interact with Salesforce.  The component supports producer and consumer endpoints to communicate with Salesforce using Java Data Transfer Objects (DTOs).  There is a companion maven plugin Camel Salesforce Plugin that generates these DTOs.    The Component supports three Salesforce APIs - 1) REST API 2) REST Bulk API 3) REST Streaming API.

Salesforce is best known for its customer relationship management (CRM) product, which is composed of Sales Cloud, Service Cloud, Marketing Cloud, Force.com, Chatter and Work.com.  They provide a developer platform which allows easy testing of Fuse and Salesforce integration.

Salesforce enables access through their APIs through their connected Apps with OAuth.  The image to the right shows the flow of OAuth with Salesforce and you can learn more at https://developer.salesforce.com/page/Digging_Deeper_into_OAuth_2.0_on_Force.com

Salesforce Setup

First a developer is required for our testing which you can get at https://developer.salesforce.com/.   The Name, Email, Username and Password are required to register.   If you already have a Developer Edition organization, verify that you have the “API Enabled” permission. This permission is enabled by default, but may have been changed by an administrator. After the account is created the connected app needs to be setup.

The main parameters to be used with the camel salesforce component are:
  • clientId
  • clientSecret
  • userName
  • password
  • loginUrl (login.salesforce.com)

A connected app (previously known as a 'remote access' app) is an application that integrates with Salesforce using APIs such as the Force.com REST and SOAP APIs. In addition to standard OAuth capabilities, connected apps allow administrators to set various security policies and have explicit control over who may use the applications.

In Salesforce, from Setup, click Create | Apps, and under Connected Apps click New to create a new connected app if you have not already done so.  The Enable OAuth Settings checkbox should be selected.  The full access OAuth Scope should be selected as well.  The Callback URL you supply here is the same as your Web application's callback URL. Usually it is a servlet if you work with Java. It must be secure: http:// does not work, only https://. For development environments, the callback URL is similar to https://localhost:8443/RestTest/oauth/_callback. When you click Save, the Consumer Key is created and displayed, and a Consumer Secret is created (click the link to reveal it).  A quick note that the OAuth 2.0 specification uses “client” instead of “consumer.” Salesforce supports OAuth 2.0.

New Connected App
After the New Connected App has been save then the OAuth Policies need to be set.  The Permitted Users should be set to All users may self authorize.  The IP Relaxation should be set to Relax IP restrictions. 

Connected Apps Management
Fuse Setup

In our simple demo we are just going to pull some data as a consumer by running a simple query on the Opportunity Object.  In future blogs we will do more complicated operations as producer and consumer.  

Camel Route with salesforce component
First  create a new project with a Blueprint Archetype.  JBoss Developer Studio 7.1.1 and Integration Stack 7.0.3 were used.

Project archetype screen creating a new Fuse Project
We will make two changes to the pom.xml.  The first is adding the camel-salesforce dependency and the camel-salesforce-maven-plugin.   The reason we want to add the salesforce maven plugin is that it allows easily building the DTOs.   In the project in the github repository you will find sample DTOs as well as a sample pom.xml.

So we will build the DTO's before updating the route.  In the directory of the workspace you run the following command:

mvn camel-salesforce:generate -DcamelSalesforce.clientId= -DcamelSalesforce.clientSecret= -DcamelSalesforce.userName= -DcamelSalesforce.password=

The four parameters should be updated with the values that were created during the salesforce setup.  The source is created in a default directory,  ${project.build.directory}/generated-sources/camel-salesforce.  Move these over to the java source directory so you can use them.  Keep in mind that if fields are changed in salesforce then the DTOs will need to be regenerated.


We built a route that contains the properties for connecting and contains a quick query to retrieve data.  A simple route was used to start the route and then consume data from Salesforce with a query.

salesforce:query?sObjectQuery=SELECT id,name from Opportunity&sObjectClass=org.apache.camel.salesforce.dto.Opportunity.class
   
For more detail on the route you can view the code in the repository.  

Running the project

The project is located at https://github.com/jbossdemocentral/fuse-components-salesforce.  The steps are in the readme.  Clone the repository and find the camel-blueprint project in the projects folder.  I put the properties in the blueprint.xml as an example to be included with the route.  I also included a unit test to run the query as well which uses a property file.

Step 1: Import the project into JBDS

Step 2: Modify the blueprint.xml and the test-salesforce-login.properties to contain the correct authentication parameters.

Step 3: Right click on the SalesforceTest.java in the src/test/java folder and select Run As Unit Test.  

Step 4: Right click on the blueprint.xml in the src/main/resources folder and select Run As Local Camel Context (without Test).

In both steps you should see the data in json returned for the opportunities.

Monday, March 2, 2015

One Way and Two Way SSL and TLS


Overview

Top to Bottom - Internet Explorer, Firefox, Safari, Chrome, and Opera 

Before going into Endpoint Security with Camel with EAP and Fuse,  I wanted to provide a quick primer on Secure Sockets Layer (SSL).  We will have a quick overview and then discuss 1-way and 2-way SSL.  SSL should be the first step in protecting sensitive data across the network pipe.  It will minimize the man-in-the-middle attacks and eavesdropping.  SSL is the standard security technology for establishing an encrypted link between a web server and a browser.  This makes sure the data passed between the server and browser or server and server remains private and not modified by providing encryption and trust.

Encryption uses a private key/public key pair which ensures that the data can be encrypted by one key but can only be decrypted by the other key pair.   This is referred to as the Public-Key Infrastructure (PKI) Scheme.  The public key is shared while the private key is kept locally.  This is described more in 1 and 2 way SSL below concerning the files and which are stored where.  This can also be extending to server to server communication, in addition to browser to server communication.

Trust is achieved through the use of certificate trust.   Certificate trust can be thought of as a chain that starts with the Certificate Authority (or CA).  A CA is a company or entity that issues SSL Certificates.   Web browsers and  systems come loaded with a list of recognized issuers and that list is kept up to date by automatic updates.   Certificates can also be self-signed for testing.

Benefits of SSL through the CIA Triad

I blogged about the CIA Triad Model which is located here,  The SANS institue has an excellent beginners guide to SSL and TLS which also describes the value of SSL/TLS in relation to the CIA Triad.
The C-I-A (Confidentiality, Integrity, Availability) Model for information security is addressed in several ways by the use of a secure communications protocol. Confidentiality of the information being passed is the main purpose of the SSL and TLS protocols. Integrity is addressed through the use of message authentication in each message from the first handshake. Additionally, non-repudiation is accounted for through certificate passing in addition to the integrity check from the message authentication. Though more responsibility for the Availability portion of the model (in this example) is placed on the server, Availability is slightly addressed since secure communications prevent malicious users from having direct access to the system. 
Difference between SSL and TLS

Transport Layer Security (TLS) and its predecessor, Secure Sockets Layer (SSL), are both cryptographic protocols designed to provide communications security over a computer network. The terms SSL and TLS are often used interchangeably or in conjunction with each other (TLS/SSL), but one is in fact the predecessor of the other — SSL 3.0 served as the basis for TLS 1.0 which, as a result, is sometimes referred to as SSL 3.1.  In this document, the US Government describes TLS Guidelines for Implementation and indicates that SSL v3 not be used for sensitive government communications or for HIPAA-compliant communications.  This chart does a good job with SSL/TLS support in browsers and the affected vulnerabilities (BEAST, POODLE, CRIME, RC4). 

No SSL

Of course with no SSL data across the network is not encrypted.   Using no SSL is usually done in a development or test environment.   

2-way SSL (Mutual or Client Authentication)

In two-way SSL authentication, the SSL client application verifies the identity of the SSL server application, and then the SSL server application verifies the identity of the SSL-client application.

Two-way SSL authentication is also referred to as client or mutual authentication because the application acting as an SSL client presents its certificate to the SSL server after the SSL server authenticates itself to the SSL client.

Establishing the encrypted channel using certificate-based 2-Way SSL involves:
  1. A client requests access to a protected resource.
  2. The server presents its certificate to the client.
  3. The client verifies the server’s certificate.
  4. If successful, the client sends its certificate to the server.
  5. The server verifies the client’s credentials.
  6. If successful, the server grants access to the protected resource requested by the client.
1-Way SSL

In such mode, the SSL-client application is not verified by the SSL-server application. Only the server is verified.
References:

http://www.sans.org/reading-room/whitepapers/protocols/ssl-tls-beginners-guide-1029
http://blog.vanillaforums.com/help/using-ssl-https-vanilla-forum/
http://en.wikipedia.org/wiki/Public_key_certificate
https://luxsci.com/blog/ssl-versus-tls-whats-the-difference.html
http://en.wikipedia.org/wiki/Transport_Layer_Security
https://luxsci.com/blog/ssl-versus-tls-whats-the-difference.html
http://mihalos.gr/2013/04/03/ssltls-protocol-overview-part1/
http://www.codeproject.com/Articles/326574/An-Introduction-to-Mutual-SSL-Authentication


Using a Customer Context with the Camel Components and Data Virtualization


Overview


Cojan van Ballegooijen, Red Hat Senior Solution Architect, Bill Kemp, Red Hat Senior Solution Architect, and 
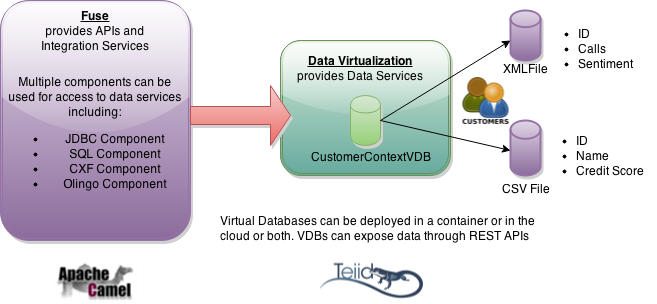
myself have created an example around a Customer Context Use Case to show how to use the Camel Components in Fuse to access a Data Virtualization Virtual Database (VDB).  The data service provides the customer context which is aggregated data from a XML file and CSV file.  The data on each customer provides the name, the credit score, the number of calls the customer has placed to customer support and the sentiment (Hot, Cold, Warm) toward the company from social media.  We will review the components and show how to run the demo.  The demo repository is located in jbossdemocentral on github.  In our project directory we have the individual use cases which are built and deployed when running the scripts.  The Teiid jdbc jar is loaded into the profile with wrap file during the run script.

Use Case 1 - JDBC Component

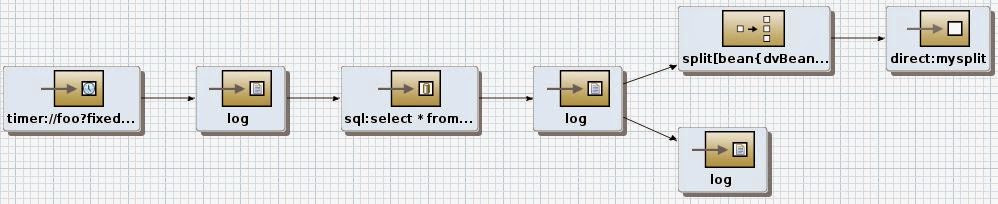
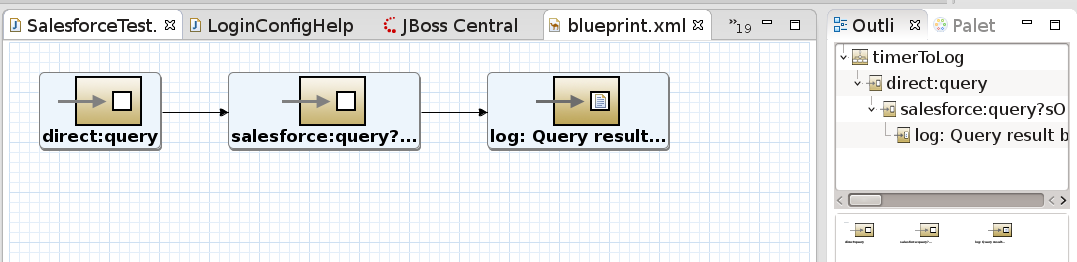
In the first use case we are set up the bean for the sql query that we want to execute and the bean for the datasource properties.  A timer component runs a query every 60 seconds, the results from the query are then split into individual records and then sent to the log.  We are using the Blueprint DSL in the blueprint.xml.

blueprint.xml design view
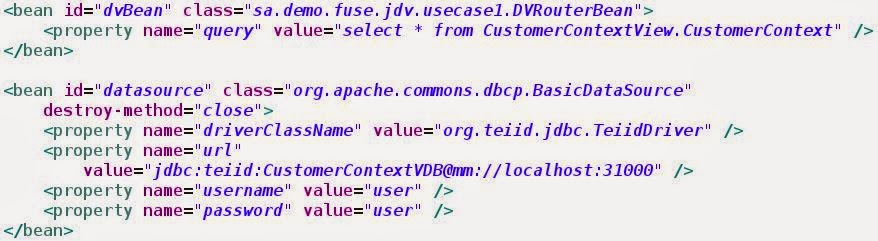
blueprint.xml source view with the query property and datasource properties
Note the url that accesses the CustomerContext Virtual Database.  Also the query is set in the body and the datasource name is part of the jdbc URI.

JDBC Component excerpt from the Camel Component Page:
The jdbc component enables you to access databases through JDBC, where SQL queries (SELECT) and operations (INSERT, UPDATE, etc) are sent in the message body. This component uses the standard JDBC API, unlike the Camel SQL Component component, which uses spring-jdbc.

Maven users will need to add thecamel-jdbc dependency to their pom.xml for this component.  This component can only be used to define producer endpoints, which means that you cannot use the JDBC component in a from() statement.  The URI Format for the JDBC component is:

jdbc:dataSourceName[?options]

This component only supports producer endpoints.   You can append query options to the URI in the following format, ?option=value&option=value&...

Use Case 2 - SQL Component

The second use case is similar to the first in that a timer component runs a query every 60 seconds, the results from the query are then split into individual records and then sent to the log.  Also we are using the Blueprint DSL in the blueprint.xml.  The difference with the SQL component is the query is part of the URI of the component.   Also we are loading the datasource into the SqlComponent class.

blueprint.xml design view
blueprint.xml source view of SqlComponent with datasource reference
SQL Component excerpt from the Camel Component Page:
The sql: component allows you to work with databases using JDBC queries. The difference between this component and JDBC component is that in case of SQL the query is a property of the endpoint and it uses message payload as parameters passed to the query.   From Camel 2.11 onwards this component can create both consumer (e.g. from()) and producer endpoints (e.g. to()).  In previous versions, it could only act as a producer.

This component uses spring-jdbc behind the scenes for the actual SQL handling.  Maven users will need to add the camel-sql dependency to their pom.xml for this component.  The SQL component also supports:
The SQL component uses the following endpoint URI notation:

sql:select * from table where id=# order by name[?options]

You can append query options to the URI in the following format, ?option=value&option=value&...

Use Case 3 - Olingo Component

The Olingo component will be a part of Fuse 6.2 so we decided to wait until that release in order to document and add this component to this demo.  You can try an example with Camel 2.14 which we have in the https://github.com/jbossdemocentral/dv-fuse-integration-demo/tree/master/projects/DVWorkspacewithFuseTest/olingo2 folder of the project.  We will cover in more detail in a follow up article for the Olingo component.

Olingo Component excerpt from Camel Component Page:
The Olingo2 component utilizes Apache Olingo version 2.0 APIs to interact with OData 2.0 and 3.0 compliant services. A number of popular commercial and enterprise vendors and products support the OData protocol. A sample list of supporting products can be found on the OData website.

Maven users will need to add the camel-olingo2 dependency to their pom.xml for this component.  The URI format for the Olingo component is:

olingo2://endpoint/?[options]

Use Case 4 - JETTY Component for a REST Service

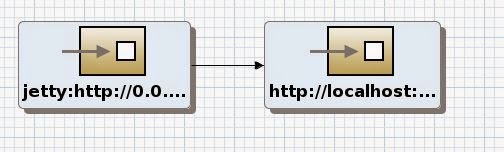
For Use Case 4 we use a REST service to expose the OData Data Virtualization Service.

blueprint.xml design view
blueprint.xml source view of the route
Note the CustomerContextVDB OData service is being used with the DV Username and Password as parameters.  This returns all the data when accessing the Jetty URL, http://localhost:9000/usecase4.

Jetty Component excerpt from the Camel Component Page:
The jetty component provides HTTP-based endpoints for consuming and producing HTTP requests. That is, the Jetty component behaves as a simple Web server. Jetty can also be used as a http client which mean you can also use it with Camel as a producer.

Maven users will need to add the camel-jetty dependency to their pom.xml for this component.  The URI format is:

jetty:http://hostname[:port][/resourceUri][?options]

You can append query options to the URI in the following format, ?option=value&option=value&...

Running the Project

Step 1: Download and unzip the repository or Clone the repository. If running on Windows, it is reccommended the project be extracted to a location near the root drive path due to limitations of length of file/path names.

Step 2: Add the DV and Fuse Products to the software directory.  You can download them from the Customer Support Portal (CSP) or jboss.org.

Step 3: Run 'init.sh' or 'init.bat' to setup the environment locally. 'init.bat' must be run with Administrative privileges.

Step 4: Run 'run.sh' or 'run.bat' to start the servers, create the container and deploy the bundles.

Step 5: Sign onto the Fuse Management console, http://localhost:8181, with the admin user and check the console log to see the output from the routes for the use cases. You can also view the Camel Diagrams.  Browse to http://localhost:9000/usecase4 to see the data for Use Case 4 through Jetty.

The demo can be run in a docker container in addition to a local install. Full instructions can be found in support/docker/README.md of the project.