Thursday, April 30, 2015

Integration Series 1 Use Case 1 - SalesForce to SAP

In the Integration Series 1 Overview, Luis Cortes (@licortes_redhat) described the integration series and the 4 use cases that we will be showing.  As you can see in the diagram to the right the integration series shows how to use Fuse as the integration platform to bridge Salesforce-SAP-Feedhenry.

Overview

It is a common scenario in enterprise customers that records of potential customers (aka prospects) are not a part of the customer database used by other applications (such as ERPs) until they become customers.

The first Use Case that we will explore is Salesforce to SAP.  When an opportunity is closed in Salesforce then a customer record is created in SAP. 


 The flow of the use case is:
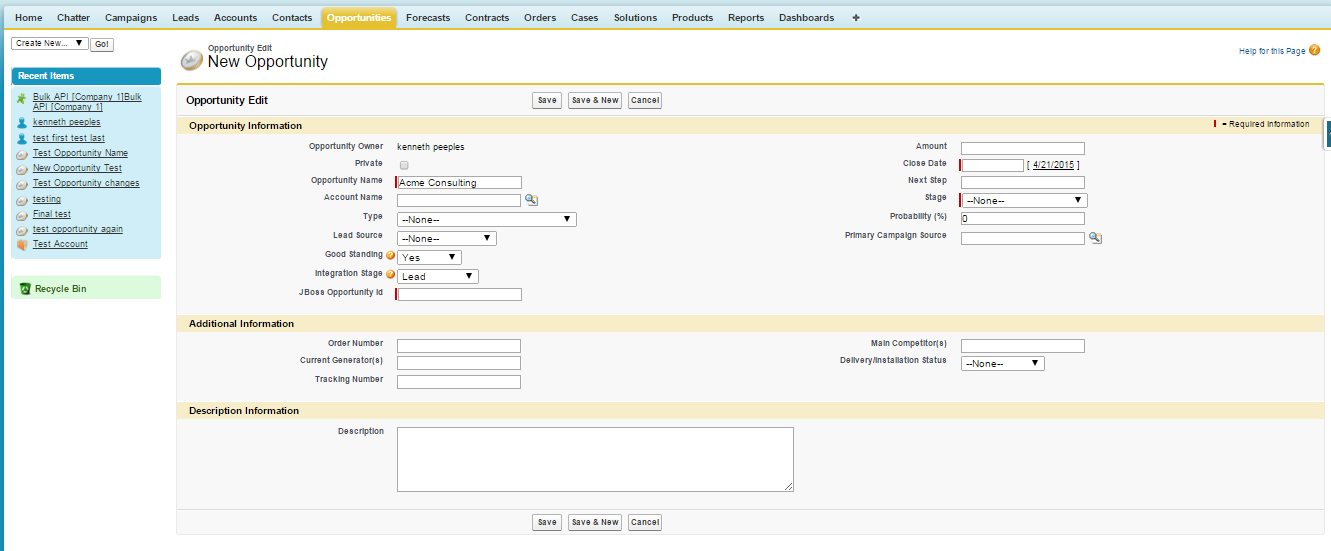
  1. View the web browser with SalesForce page with info on the opportunity “Acme Consulting”.
  2. View the web browser with SAP customers screen, we search for “Acme consulting”, it dos not appear there.
  3. Back to the browser.
  4. Click on the dropdown “Stage” and change it to “Closed win”
  5. Submit
  6. Now SalesForce page shows “Acme Consulting” opportunity with stage as “Closed Win”
  7. Show web browser with SAP customers, we search for “Acme consulting”, it appears there with the info from SalesForce
The Opportunity Salesforce screen:


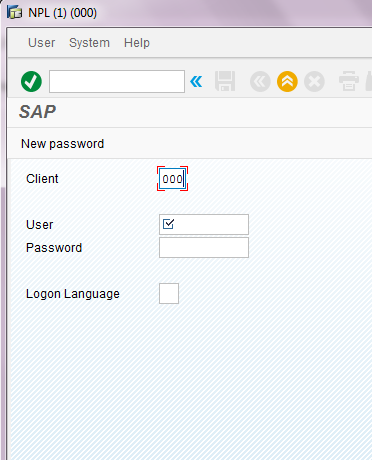
The SAP Customer Search screen in SAP GUI Console:


Requirements

In order to use the test code to run the use case you must have completed the simple demos with the components in order to have the accounts and server side setup correctly.  The Salesforce Component and SAP JCo Components will be used with Use Case 1.
The Project for Use Case 1

First import the first use case into JBDS.  Let's take a look at the pom.xml which will contain the dependencies for the Salesforce and SAP JCo Components.

  1
  2
  3
  4
  5
  6
  7
  8
  9
 10
 11
 12
 13
 14
 15
 16
 17
 18
 19
 20
 21
 22
 23
 24
 25
 26
 27
 28
 29
 30
 31
 32
 33
 34
 35
 36
 37
 38
 39
 40
 41
 42
 43
 44
 45
 46
 47
 48
 49
 50
 51
 52
 53
 54
 55
 56
 57
 58
 59
 60
 61
 62
 63
 64
 65
 66
 67
 68
 69
 70
 71
 72
 73
 74
 75
 76
 77
 78
 79
 80
 81
 82
 83
 84
 85
 86
 87
 88
 89
 90
 91
 92
 93
 94
 95
 96
 97
 98
 99
100
101
102
103
104
105
106
107
108
109
110
111
112
113
114
115
116
117
118
119
120
121
122
123
124
125
126
127
128
129
130
131
132
133
134
135
136
137
138
139
140
141
142
143
144
145
146
147
148
149
150
151
152
153
154
155
156
157
158
159
160
161
162
163
164
165
166
167
168
169
170
171
172
173
174
175
176
177
178
179
180
181
182
183
184
185
186
187
188
189
190
191
192
193
194
195
196
197
198
199
200
201
202
203
204
<?xml version="1.0" encoding="UTF-8"?>
<project xmlns="http://maven.apache.org/POM/4.0.0" xmlns:xsi="http://www.w3.org/2001/XMLSchema-instance"
         xsi:schemaLocation="http://maven.apache.org/POM/4.0.0 http://maven.apache.org/maven-v4_0_0.xsd">

  <modelVersion>4.0.0</modelVersion>

  <groupId>com.mycompany</groupId>
  <artifactId>camel-spring</artifactId>
  <packaging>jar</packaging>
  <version>1.0.0-SNAPSHOT</version>

  <name>A Camel Spring Route</name>
  <url>http://www.myorganization.org</url>

  <properties>
    <project.build.sourceEncoding>UTF-8</project.build.sourceEncoding>
    <project.reporting.outputEncoding>UTF-8</project.reporting.outputEncoding>
  </properties>

  <repositories>
    <repository>
      <id>release.fusesource.org</id>
      <name>FuseSource Release Repository</name>
      <url>http://repo.fusesource.com/nexus/content/repositories/fs-releases</url>
      <snapshots>
        <enabled>false</enabled>
      </snapshots>
      <releases>
        <enabled>true</enabled>
      </releases>
    </repository>
    <repository>
     <id>ea.fusesource.org</id>
     <name>FuseSource Community Early Access Release Repository</name>
     <url>http://repo.fusesource.com/nexus/content/groups/ea</url>
     <snapshots>
      <enabled>false</enabled>
     </snapshots>
     <releases>
      <enabled>true</enabled>
     </releases>
    </repository>    
    <repository>
      <id>snapshot.fusesource.org</id>
      <name>FuseSource Snapshot Repository</name>
      <url>http://repo.fusesource.com/nexus/content/repositories/snapshots</url>
      <snapshots>
        <enabled>true</enabled>
      </snapshots>
      <releases>
        <enabled>false</enabled>
      </releases>
    </repository>
  </repositories>

  <pluginRepositories>
    <pluginRepository>
      <id>release.fusesource.org</id>
      <name>FuseSource Release Repository</name>
      <url>http://repo.fusesource.com/nexus/content/repositories/releases</url>
      <snapshots>
        <enabled>false</enabled>
      </snapshots>
      <releases>
        <enabled>true</enabled>
      </releases>
    </pluginRepository>
    <pluginRepository>
     <id>ea.fusesource.org</id>
     <name>FuseSource Community Early Access Release Repository</name>
     <url>http://repo.fusesource.com/nexus/content/groups/ea</url>
     <snapshots>
      <enabled>false</enabled>
     </snapshots>
     <releases>
      <enabled>true</enabled>
     </releases>
    </pluginRepository>      
    <pluginRepository>
      <id>snapshot.fusesource.org</id>
      <name>FuseSource Snapshot Repository</name>
      <url>http://repo.fusesource.com/nexus/content/repositories/snapshots</url>
      <snapshots>
        <enabled>true</enabled>
      </snapshots>
      <releases>
        <enabled>false</enabled>
      </releases>
    </pluginRepository>
  </pluginRepositories>

  <dependencies>
    <dependency>
      <groupId>org.apache.camel</groupId>
      <artifactId>camel-core</artifactId>
      <version>2.12.0.redhat-610394</version>
    </dependency>
    <dependency>
      <groupId>org.apache.camel</groupId>
      <artifactId>camel-spring</artifactId>
      <version>2.12.0.redhat-610394</version>
    </dependency>
    
    <!-- camel-salesforce -->
    <dependency>
      <groupId>org.apache.camel</groupId>
      <artifactId>camel-salesforce</artifactId>
      <version>2.12.0.redhat-610394</version>
    </dependency>

<dependency>               
 <groupId>com.sap.conn.jco</groupId>              
 <artifactId>sapjco3</artifactId>              
 <version>3.0.11</version>              
 <scope>system</scope>              
 <systemPath>/home/kpeeples/sapjco3/sapjco3.jar</systemPath>        
 </dependency>   
<dependency>          
 <groupId>org.fusesource</groupId>          
 <artifactId>camel-sap</artifactId>         
 <version>1.0.0.redhat-379</version>         
 <exclusions>                
  <exclusion>                      
   <groupId>com.sap.conn.jco</groupId>
              <artifactId>sapjco3</artifactId>
   </exclusion>             
  </exclusions>        
</dependency>

<dependency>
  <groupId>org.apache.camel</groupId>
  <artifactId>camel-xmljson</artifactId>
  <version>2.12.0.redhat-610394</version>
  <!-- Use the same version as camel-core, but remember that this component is only available from 2.10 onwards -->
</dependency>
 

    <!-- logging -->
    <dependency>
      <groupId>org.slf4j</groupId>
      <artifactId>slf4j-api</artifactId>
      <version>1.7.5</version>
    </dependency>
    <dependency>
      <groupId>org.slf4j</groupId>
      <artifactId>slf4j-log4j12</artifactId>
      <version>1.7.5</version>
    </dependency>
    <dependency>
      <groupId>log4j</groupId>
      <artifactId>log4j</artifactId>
      <version>1.2.17</version>
    </dependency>

    <!-- testing -->
    <dependency>
      <groupId>org.apache.camel</groupId>
      <artifactId>camel-test-spring</artifactId>
      <version>2.12.0.redhat-610394</version>
      <scope>test</scope>
    </dependency>

  </dependencies>

  <build>
    <defaultGoal>install</defaultGoal>

    <plugins>
      <plugin>
        <groupId>org.apache.maven.plugins</groupId>
        <artifactId>maven-compiler-plugin</artifactId>
        <version>2.5.1</version>
        <configuration>
          <source>1.6</source>
          <target>1.6</target>
        </configuration>
      </plugin>
      <plugin>
        <groupId>org.apache.maven.plugins</groupId>
        <artifactId>maven-resources-plugin</artifactId>
        <version>2.6</version>
        <configuration>
          <encoding>UTF-8</encoding>
        </configuration>
      </plugin>

      <!-- allows the route to be ran via 'mvn camel:run' -->
      <plugin>
        <groupId>org.apache.camel</groupId>
        <artifactId>camel-maven-plugin</artifactId>
        <version>2.12.0.redhat-610379</version>
      </plugin>
      
            <!-- camel -->
      <plugin>
        <groupId>org.apache.camel.maven</groupId>
        <artifactId>camel-salesforce-maven-plugin</artifactId>
        <version>2.12.0.redhat-610394</version>
      </plugin>
      
    </plugins>
  </build>

</project>

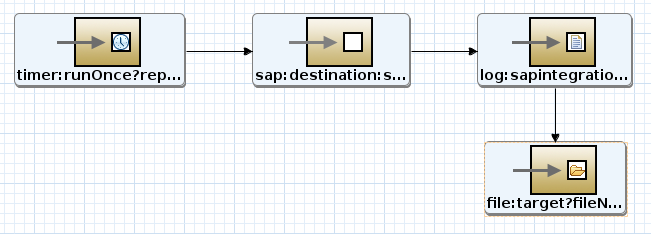
Now we will examine the Camel-Context.xml.

First we are setting up the requirements for Salesforce and then the requirements for SAP.  We subscribe to the CamelTest Topic to listen for changes to Opportunity Objects.  Any that have been modified to 'Closed Won'  then create the Customer from the Opportunity Name (in the future we could grab the Account Name) in SAP.  Then we grab the customer list back from SAP and can verify the customer was created.

 1
 2
 3
 4
 5
 6
 7
 8
 9
10
11
12
13
14
15
16
17
18
19
20
21
22
23
24
25
26
27
28
29
30
31
32
33
34
35
36
37
38
39
40
41
42
43
44
45
46
47
48
49
50
51
52
53
54
55
56
57
58
59
60
61
62
63
64
65
66
67
68
69
70
71
72
73
74
75
76
77
78
79
80
81
82
83
84
85
86
87
88
89
<?xml version="1.0" encoding="UTF-8"?>
<!-- Configures the Camel Context-->

<beans xmlns="http://www.springframework.org/schema/beans"
       xmlns:xsi="http://www.w3.org/2001/XMLSchema-instance"
       xmlns:camel="http://camel.apache.org/schema/spring"
       xsi:schemaLocation="
       http://www.springframework.org/schema/beans http://www.springframework.org/schema/beans/spring-beans.xsd
       http://camel.apache.org/schema/spring http://camel.apache.org/schema/spring/camel-spring.xsd">
 <bean
  class="org.springframework.beans.factory.config.PropertyPlaceholderConfigurer">
  <property name="location">
   <value>classpath:salesforce.properties</value>
  </property>
 </bean>
 <bean id="salesforce"
  class="org.apache.camel.component.salesforce.SalesforceComponent">

  <property name="loginConfig">
   <bean class="org.apache.camel.component.salesforce.SalesforceLoginConfig">
    <property name="loginUrl" value="${loginUrl}"></property>
    <property name="userName" value="${userName}"></property>
    <property name="password" value="${password}"></property>
    <property name="clientId" value="${clientId}"></property>
    <property name="clientSecret" value="${clientSecret}"></property>
   </bean>
  </property>
  <property name="config">
   <bean
    class="org.apache.camel.component.salesforce.SalesforceEndpointConfig">
    <property name="sObjectName" value="${sObjectName}"></property>
    <property name="sObjectClass" value="${sObjectClass}"></property>
   </bean>
  </property>
  <property name="packages" value="${sObjectDTOPackages}"></property>
 </bean>
   <bean id="sap" class="org.fusesource.camel.component.sap.SAPComponent">
   <property name="destinationDataStore">
    <map>
     <entry key="NPL" value-ref="nplDestinationData" />
    </map>
   </property>
   <property name="serverDataStore">
    <map />
   </property>
   <property name="repositoryDataStore">
    <map />
   </property>
  </bean>

  <bean id="nplDestinationData" class="org.fusesource.camel.component.sap.model.rfc.impl.DestinationDataImpl">
   <property name="ashost" value="nplhost1" />
   <property name="sysnr" value="00" />
   <property name="client" value="001" />
   <property name="user" value="developer" />
   <property name="passwd" value="password" />
   <property name="lang" value="en" />
  </bean>
  

 <camelContext xmlns="http://camel.apache.org/schema/spring">
 
 <dataFormats>
     <xmljson id="xmljson"/>
     <xmljson id="xmljsonWithOptions" forceTopLevelObject="true" trimSpaces="true" rootName="newRoot" skipNamespaces="true" 
             removeNamespacePrefixes="true" expandableProperties="d e"/>
 </dataFormats>
 
    <route id="sfRoute">
        <!--   from uri="timer://foo?repeatCount=0"/> -->
        <from uri="salesforce:CamelTest?notifyForFields=ALL&amp;notifyForOperations=ALL&amp;sObjectName=Opportunity&amp;updateTopic=true&amp;sObjectQuery=SELECT Id, Name, StageName, AccountId FROM Opportunity"/>
        <convertBodyTo type="java.lang.String"/>
        <unmarshal ref="xmljson"/>
        <log message="Query result back from Salesforce: ${body}"/>
  <choice>
            <when>
                <xpath>/o/StageName='Closed Won'</xpath>
                <to uri="sap:destination:NPL:BAPI_FLCUST_CREATEFROMDATA?transacted=true" />
         <to uri="sap:destination:NPL:BAPI_FLCUST_GETLIST" />
   <to uri="log:sapintegration?level=INFO" />
   <to uri="file:target?fileName=BAPI_FLCUST_GETLIST.xml" />
            </when>
            <otherwise>
                <to uri="log:otherwise display" />
            </otherwise>
        </choice>
    </route>
</camelContext>
</beans>

The properties used for salesforce are in the salesforce.properties file while the properties for SAP are in the camel-context.xml.

1
2
3
4
5
6
7
8
loginUrl=https://login.salesforce.com
clientId=
clientSecret=
userName=[email protected]
password=
sObjectDTOPackages=org/apache/camel/salesforce/dto
sObjectName=Opportunity
sObjectClass=org.apache.camel.salesforce.dto.Opportunity.class

Running the Use Case Code

Step 1 - Download the Project from JBoss Demo Central - https://github.com/jbossdemocentral/fh-fuse-sap-sf-integration-demo

Step 2 - Import into JBDS

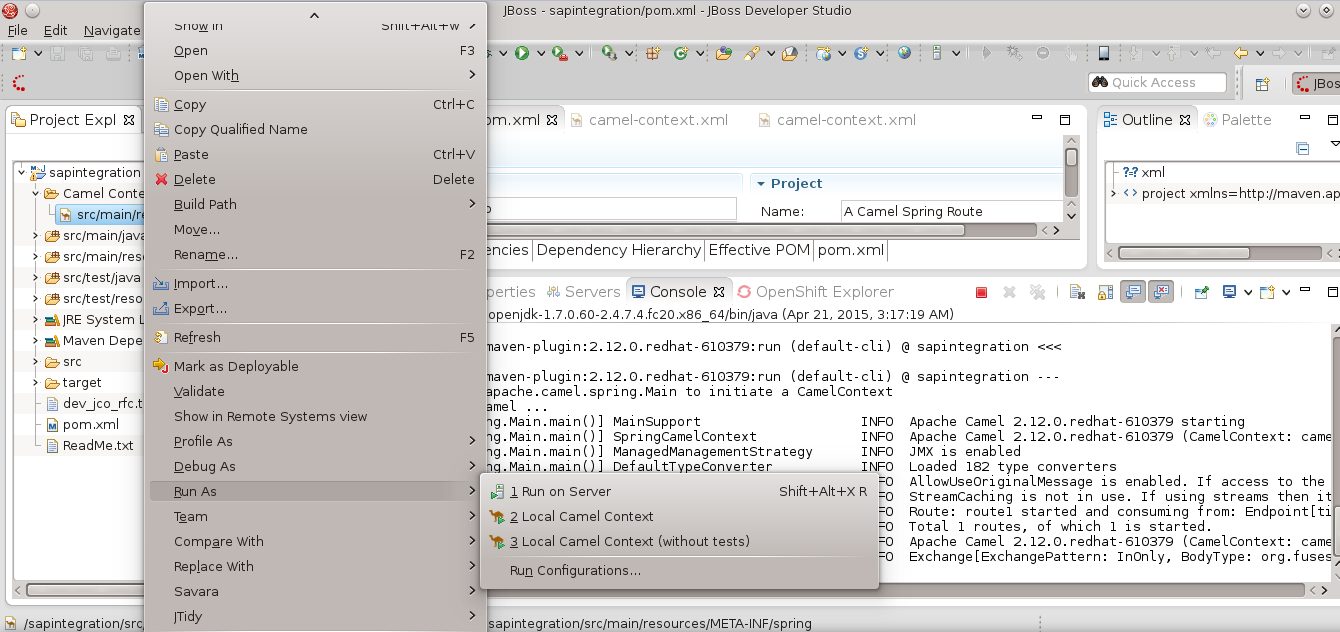
Step 3 - Right click on the Camel Context in the uc1 Project and run as Camel Context without tests

Step 4 - Create the ACME Consulting Opportunity and change the stage to Closed Win

Step 5 - Submit 

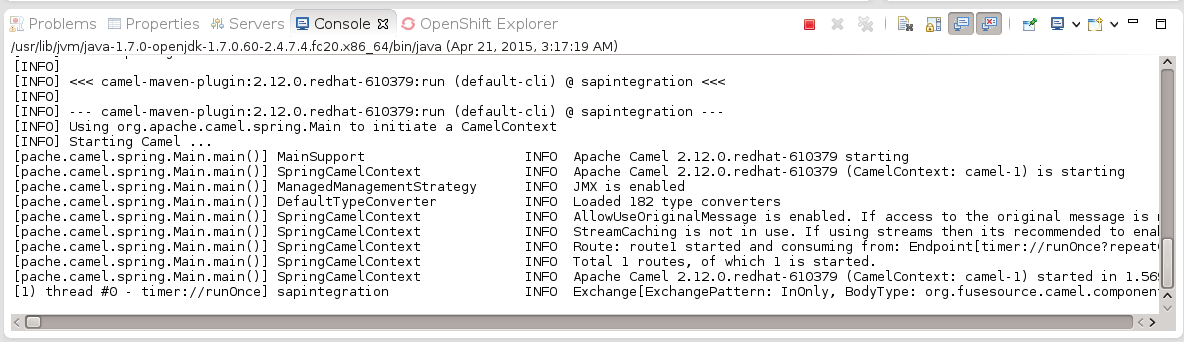
Step 6 - Look at the console window

Step 7 - The route will show the Closed Opportunity is picked up and the customer is created in SAP.

Step 8 - The route will also show the search of the opportunity and it is displayed in the log

Step 9 - Verify through the SAP GUI console that the Customer is created

Presentation:


Video:


References

Series References

Integration Series 1 (This article) - Overview from Luis Cortes
Integration Series 1 Use Case 1 - SalesForce to SAP 
Integration Series 1 Use Case 2 - Mobile to SalesForce to SAP
Integration Series 1 Use Case 3 - SAP to SalersForce 
Integration Series 1 Use Case 4 - SAP to Mobile to SalesForce

Wednesday, April 29, 2015

What are the benefits of Node.js?

What is Node.js?

Ryan Dahl, and other developers, at Joyent created Node.js.  Node.js is an open source, cross-platform runtime environment for server-side and networking applications. It brings event-driven programming to web servers enabling development of fast web servers in Javascript.

In an event-driven application, there is a main loop that listens for events, and then triggers a callback function when one of those events is detected.  Node.js also provides a non-blocking I/O API that optimizes an application's throughput and scalability.   In a non-blocking language, commands execute in parallel, and use callbacks to signal completion.  In a blocking language, commands execute only after the previous command has completed.

Node.js uses the Google V8 JavaScript engine to execute code, and a large percentage of the basic modules are written in JavaScript. Node.js contains a built-in library to allow applications to act as a Web server without software such as Apache HTTP Server or IIS.

NPM is the pre-installed package manager for the Node.js server platform. It is used to install Node.js programs from the npm registry.  The package manager allows publishing and sharing of open-source Node.js libraries by the community, and simplifies installation, updating and un-installation of libraries.

What are some of the Benefits of Node.js?

1. Asynchronous I/O
It's built to handle asynchronous I/O from the ground up and is a good match to a lot of common web- and network-development problems.  In addition to fast JavaScript execution, the real magic behind Node.js is called the Event Loop. To scale to large volumes of clients, all I/O intensive operations in Node.js are performed asynchronously.

2. Javascript
Node.js is Javascript.  So the same language can be used on the backend and frontend.   This means it breaks down the boundaries between front- and back-end development.
3. Community Driven
In addition to it’s innate capabilities, Node.js has a thriving open source community which has produced many excellent modules to add additional capabilities to Node.js applications. One of the most famous is Socket.io, a module to manage persistent connections between client and server, enabling the server to push real-time updates to clients. Socket.io abstracts the technology used to maintain these connections away from the developer, automatically using the best technology available for a particular client (websockets if the browser supports it, JSONP or Ajax longpolling if not).

References:
https://blog.udemy.com/learn-node-js/
http://pettergraff.blogspot.com/2013/01/why-node.html

Tuesday, April 21, 2015

Connecting to SAP from Fuse 6.1 Part 2 - Java Connector (JCo) Component

In the first part of connecting to SAP from Fuse 6.1 we showed how to use the Camel SAP Netweaver Gateway Component with a sample developer account and sample data.  The Netweaver Gateway component is part of Camel as of 2.12.   In this second part we examine using the Camel SAP JCo (Java Connector) component.  This camel component is included as part of the Fuse 6.1 Enterprise product and is supported by Red Hat but is not part of the Camel community at this point.

The diagram shows the technical schema of data conversion in the SAP JCo (standalone version). Starting from a Java application, a Java method is forwarded via the JCo Java API (Application Programming Interface) and an additional Middleware Interface to RFC Middleware, where it is converted to an RFC (ABAP) call using the JNI(Java Native Interface) layer, and sent to the SAP system. Using the same method in the other direction, an RFC Call is converted to Java and forwarded to the Java application.

SAP provides SAP Java Connector as a standalone software component that can be installed independently of the SAP system. You can access the installation files at service.sap.com/connectors.  In order to download the Java Connector you must  have a S User or service account which is explained in this article.


Overview

The SAP Component enables outbound and inbound communication to and from SAP systems using synchronous remote function calls, sRFC.  The component uses the SAP Java Connector (SAP JCo) library to facilitate bidirectional communication with SAP.  The component supports two types of endpoints: destination endpoints and server endpoints.  You can find more on the Fuse 6.1 Camel JCo Component in the Red Hat documentation.  We will give a quick comparison of the two components, discuss the demonstration setup and then show how to run the demonstration.

SAP Netweaver Gateway Component

Pros
  • Familiar tools and technologies for Java developers
  • Existing ABAP functions/dialogs can easily be exposed as a gatway service
Cons
  • Netweaver Gateway needs to be installed in SAP backend or separately at a cost
  • Creating services in ABAP not trivial for for more complex scenarios
  • Not transactional
JCo Camel Component

Pros
  • Fits well into the Java EE world
  • No additional installs on SAP backend
  • Bidirectional communication (Java Calls SAP, SAP calls Java)
  • Transactional
Cons
  • Proprietary protocol
  • Complexity
Demonstration Overview

For our sample we will start a timer that will fire only once, get customers, log them and then save the customers to a file.  The Camel Route is shown in this diagram.  Let's take a quick look at the setup of the project in order to use the JCo component.  


Project Setup

The following will be required in the pom.xml:

 1
 2
 3
 4
 5
 6
 7
 8
 9
10
11
12
13
14
15
16
17
18
<dependency>               
 <groupId>com.sap.conn.jco</groupId>              
 <artifactId>sapjco3</artifactId>              
 <version>3.0.11</version>              
 <scope>system</scope>              
 <systemPath>/home/kpeeples/sapjco3/sapjco3.jar</systemPath>        
 </dependency>   
<dependency>          
 <groupId>org.fusesource</groupId>          
 <artifactId>camel-sap</artifactId>         
 <version>1.0.0.redhat-379</version>         
 <exclusions>                
  <exclusion>                      
   <groupId>com.sap.conn.jco</groupId>
              <artifactId>sapjco3</artifactId>
   </exclusion>             
  </exclusions>        
</dependency>

The first dependency defines the location of the sapjco3.jar.   The sapjco3 folder also contains the libsapjco3.so.  The second dependency is required for the camel-sap component.  Now we can define our route in our Camel Context.  The URI Scheme of the component is:

sap:[destination:destinationName|server:serverName]rfcName?options

The destination: prefix designates a destination endpoint and destinationName is the name of a specific outbound connection to an SAP instance. Outbound connections are named and configured at the component level. The rfcName in a destination endpoint URI is the name of the RFC invoked by the endpoint in the connected SAP instance.

The server: prefix designates a server endpoint and serverName is the name of a specific inbound connection from an SAP instance. Inbound connections are named and configured at the component level.  The rfcName in a server endpoint URI is the name of the RFC handled by the endpoint when invoked from the connected SAP instance.

The SAP component maintains three maps to store destination data, server data and repository data. The component’s property, destinationDataStore, stores destination data keyed by destination name, the property,serverDataStore, stores server data keyed by server name and the property, repositoryDataStore, stores repository data keyed by repository name. These configurations must be passed to the component during its initialization.  So for our demo we have the following since we are just going to retrieve customer data:

 1
 2
 3
 4
 5
 6
 7
 8
 9
10
11
12
13
  <bean id="sap" class="org.fusesource.camel.component.sap.SAPComponent">
   <property name="destinationDataStore">
    <map>
     <entry key="NPL" value-ref="nplDestinationData" />
    </map>
   </property>
   <property name="serverDataStore">
    <map />
   </property>
   <property name="repositoryDataStore">
    <map />
   </property>
  </bean>

The configurations for destinations are maintained in the destinationDataStore property of the SAP component. Each entry in this map configures a distinct outbound connection to an SAP instance. The key for each entry is the name of the outbound connection and is used in the destinationName component of a destination endpoint URI as described in the URI format section.

1
2
3
4
5
6
7
8
  <bean id="nplDestinationData" class="org.fusesource.camel.component.sap.model.rfc.impl.DestinationDataImpl">
   <property name="ashost" value="nplhost" />
   <property name="sysnr" value="00" />
   <property name="client" value="001" />
   <property name="user" value="developer" />
   <property name="passwd" value="password" />
   <property name="lang" value="en" />
  </bean>

Now we can look at our camel context.


1
2
3
4
5
6
7
8
<camel:camelContext xmlns="http://camel.apache.org/schema/spring">
   <camel:route>
    <camel:from uri="timer:runOnce?repeatCount=1" />
    <camel:to uri="sap:destination:NPL:BAPI_FLCUST_GETLIST" />
    <camel:to uri="log:sapintegration?level=INFO" />
    <camel:to uri="file:target?fileName=BAPI_FLCUST_GETLIST.xml" />
   </camel:route>
  </camel:camelContext>

We start the route with a timer that will just run once.  We use the sap component with the destination endpoint with the destination name NPLdestination.   Then we use the rfcName BAPI_FLCUST_GETLIST that we populate in the SAP setup, which in our case is the cloud appliance described below.  Once we retrieve the customer list from SAP we log the response and save the data to a file.

The full source code is at https://github.com/jbossdemocentral/fuse-components-sap.  But before we can run the Camel Context we have to setup the SAP Server with the data.  So in our demonstration as we stated before we are using a Cloud Appliance.

I’ll assume you have an SAP instance you can have access to.  If that is not the case, please go here to create your own SAP Cloud Appliance in AWS, that covers what’s needed for running this demo:

- Amazon account creation and prerequisites for configuring it
- Using the Access and Secret keys
- The 5 steps to get the SAO Cloud Appliance ready in cal.sap.com
- Create and install a Minisap license
- Create example data to work with (380 entries on CUSTOMER_LIST)

Run the Project to list the Customer Data
After creating the project as described above or from cloning the repository and then importing into JBDS, right click on the camel-context.xml under src/main/resources/META-INF/spring/ then select Run As then Camel Context (without tests)


You will see the Camel Context start with the results below.  You can turn on trace to get more information.


You can view the BAPI_FLCUST_GETLIST.xml file to find all the data returned from SAP.

 1
 2
 3
 4
 5
 6
 7
 8
 9
10
11
12
13
14
15
16
17
<bapi_flcust_getlist:response xmlns:bapi_flcust_getlist="http://sap.fusesource.org/rfc/NPL/BAPI_FLCUST_GETLIST">
  <customer_list>
    <row city="Walldorf" countr="DE" countr_iso="DE" custname="SAP AG" customerid="00000001" email="[email protected]" form="Firma" phone="06227-34-0" pobox="" postcode="69190" region="" street="Dietmar-Hopp-Allee 16">
    <row city="Walldorf" countr="DE" countr_iso="DE" custname="Andreas Klotz" customerid="00000002" email="[email protected]" form="Herr" phone="05344-676792" pobox="" postcode="69190" region="" street="Pimpinellenweg 9">
.
.
.
    <row city="Mannheim" countr="DE" countr_iso="DE" custname="Christine Pan" customerid="00004686" email="[email protected]" form="Frau" phone="0621/812547" pobox="" postcode="68163" region="" street="Emil-Heckel-Str. 102">
    <row city="Emmendingen" countr="DE" countr_iso="DE" custname="Horst Mechler" customerid="00004687" email="[email protected]" form="Herr" phone="07641 927813" pobox="" postcode="79312" region="" street="Elzstrasse 27">
  </row></row></row></row></customer_list>
  <customer_range>
  <extension_in>
  <extension_out>
  <return>
    <row field="" id="BC_IBF" log_msg_no="000000" log_no="" message="Method was executed successfully" message_v1="" message_v2="" message_v3="" message_v4="" number="000" parameter="" system="NPLCLNT001" type="S">
  </row></return>
</extension_out></extension_in></customer_range></bapi_flcust_getlist:response>
 

Setting up a SAP Cloud Appliance for Testing with the JBoss Fuse Camel JCo Component


This article will help you setup a SAP Cloud Appliance with a SAP Netweaver Application Server ABAP 7.4 on SAP MaxDB [trial edition] instance running on AWS so you can test the JBoss Fuse Camel JCo Component.  An example usage with Fuse is in this article.

We will go through the steps to get the instance ready with the license and with some example data to begin testing.    The main steps are as follows:

- Amazon account creation and prerequisites for configuring it
- Using the Access and Secret keys
- The 5 steps to get the SAP Cloud Appliance ready in cal.sap.com
- Create and install a Minisap license
- Create example data to work with (380 entries on CUSTOMER_LIST)

Cloud Appliance
First we must have a Amazon Account at aws.amazon.com.  Amazon will be our cloud provider and we must have the security credentials (Access Key and Secret Key) to add to the SAP CAL account. These types of accounts can be created using consolidated billing in AWS. Note that there are several prerequisites for configuring your AWS account:
  • Enable the Amazon EC2 service for your AWS account
  • Your IAM user has the following roles: AmazonEC2FullAccess, AmazonVPCFullAccess, ReadOnlyAccess, and AWSAccountUsageReportAccess
For more information about specific questions for the AWS cloud provider for SAP, see the FAQ.

After adding the EC2 service on AWS, you must follow the following steps:
  • The Access Key and the Secret Key of your AWS account
  1. Navigate to http://aws.amazon.com. 
  2. Logon to your account. 
  3. Choose Account  then Security Credentials. 
  4. In the Access Credentials section: 
    1. To see your access key, choose the Access Keys tab. 
    2. To see your secret key, choose the Secret Access Key tab and then choose the Show link. 
  • The virtual private cloud parameter (VPC) VPC is needed to be configured in the AWS location US-East (Virginia). 


Now that we have the Access Keys we can get the SAP Cloud Appliance ready.  We have to go to cal.sap.com to go through 5 steps:


1. Register


2. Add the security credentials


3. Add the solution and in our case we chose the  SAP Netweaver Application Server ABAP 7.4 on SAP MaxDB [trial edition].


4. Create the instance which can take awhile to activate/start


5. Now we can connect to the SAP system and add the sample data.  You can click on connect under operations which will bring up the access point.


You can click on SAP GUI (NPL,001,00) but before doing so you need the SAP GUI in order to connect to the instance.  You can get the SAP GUI from the service marketplace or from the appliance with ssh/scp.


From the getting started guide which can be accessed through the connection access point screen above:

You need a SAP GUI 7.20 Patch level 9 or above.
For the Windows OS (32 bit and 64 bit) you can find the SAPGUI software package on the server at: /sapmnt/A4H/custom/SAP_GUI_for_Windows_7.30_Patchlevel_4_Hotfix_1_for _SAP_SCN_(Trial)_20130611_0830.exe
You have to copy the according file to your computer and start the self-extraction.
A SAPGUI for the Java Environment can be found on the server at: /sapmnt/A4H/custom/SAP_GUI_FOR_JAVA_730.zip
You have to copy the according file to your computer, unpack the archive and follow the installation instructions.


Create License

The ABAP system comes with a temporary license that allows you to logon to the system. As first step before using the system you need to install a 90 days Minisap license as follows:
1. Logon to ABAP via SAP GUI with user SAP* in tenant 000. “SAP*/ch4ngeme”


2. Start transaction SLICENSE 
3. Get a “Minisap” license at http://www.sap.com/minisap . As system ID choose NPL - SAP NetWeaver 7.x (MaxDB). As hardware key use the hardware key shown in transaction SLICENSE.


4. Click “Install new License” under edit and select the downloaded license from step 3.


5. After license installation call transaction SECSTORE and run a check for all entries using F8. 

This is needed to enable RFC after the change of the installation number from INITIAL to DEMOSYSTEM. Installing the Minisap license will change the installation number from INITIAL to DEMOSYSTEM. The developer access key for user DEVELOPER and installation number DEMOSYSTEM is already in the system and you can start developing in the customer name range (Z*, Y*).

Create the Data
Now we can create the data on SAP.
Step 1: Navigate to transaction “SE38”
Step 2: Run the program SAPBC_DATA_GENERATOR clicking the clock with green checkmark
Step 3: Hit the clock/checkmark again
Step 4: Start Transaction SE37 and launch function module “BAPI_FLCUST_GETLIST” by clicking on the wrench
Step 5: Provide a search pattern in the CUSTOMER_NAME field (such as S*) and hit the execute button
Step 6: You should have 380 entries in the resulting CUSTOMER_LIST
Step 7: Click on the list icon to browse the list

Monday, April 20, 2015

Integration Series 1 - JBoss Fuse integration bridges the gap between SAP, SalesForce and mobile apps


We have a guest blogger this week. Luis Cortes,  Principal Manager of Product Marketing at Red Hat, @licortes_redhatwill give us an overview of our Salesforce, SAP, Fuse and Feedhenry integration series.

A common need of JBoss Fuse enterprise customers is the creation of business solutions that integrate complex software products such as CRM or ERP systems (think SAP). To this day many of them reside on-premise in the companies’ data centers, although more and more companies are moving them to PaaS and private clouds. In addition, the ever-growing adoption of SaaS services adds new demands to integrate with 3rd party services hosted in public clouds, such as Salesforce.

But we’re not done yet. To add to the always on, ubiquitous nature of business, the enterprise is going mobile at a growing speed, and this requires real-time access from all type of devices to critical information that resides and interacts with the above mentioned solutions.

In the next four blogs of this series, Kenny Peeples will guide us on how JBoss Fuse can be a key element in easily integrating your systems regardless of whether they reside on premise or in the cloud, including mobile interaction.

For this we have decided to showcase Fuse-SAP connectivity via Fuse JCo connector and Fuse NetWeaver Gateway connector; Fuse-SalesForce connectivity via the Fuse SalesForce connector; and Fuse-mobile connectivity via FeedHenry (Red Hat mobile application platform) via its REST API.

Due to the variety of ways our customers run JBoss products, we also want to show you different scenarios, with Fuse running on premise and in the cloud. In the first series of articles Fuse will be running on premise and the rest of pieces in the cloud as services: FeedHenry in the could, SAP in the SAP Cloud, and SalesForce, well, in the SalesForce cloud :-) In addition, the last article of the series will showcase the same demo with Fuse also running in the cloud, as iPaaS in OpenShift. We’ll give you instructions to run both on premise and in the cloud.


With this, we will highlight four use cases:

1. SalesForce to SAP: The personal data in Salesforce of a customer that has confirmed a purchase will be used to create a new customer record in SAP.

2. Mobile to SalesForce to SAP: Using a smartphone, a sales person closes a sales opportunity, the associated opportunity in SalesForce is updated accordingly and the personal data of the customer is used to create a new customer record in SAP.

3. SAP to SalersForce: A customer is late on payments and gets flagged in SAP, and the Salesforce record is accordingly updated to alert the sales team of a potential sales risk.

4. SAP to Mobile to SalesForce: A customer is late on payments and gets flagged in SAP, an alert appears on the smartphone of its manager, which puts the customer “on hold”, and the Salesforce record is accordingly updated to alert the sales team of a potential sales risk.

As you go through them, think of all the possibilities this opens to integrate these or additional systems using Camel routes and the more of 150 connectors offered by Fuse, and how to use this on your next projects to integrate systems in disparate environments.

Presentation:


Video:


References:
Integration Series 1 (This article) - Overview from Luis Cortes
Integration Series 1 Use Case 1 - SalesForce to SAP 
Integration Series 1 Use Case 2 - Mobile to SalesForce to SAP
Integration Series 1 Use Case 3 - SAP to SalersForce 
Integration Series 1 Use Case 4 - SAP to Mobile to SalesForce